What is rotation?
Rotation in mathematics means turning around a centre.
The distance from the centre to any point on the shape stays the same.
What information do we need to carry out a rotation?
If we tried to describe something that was turned in real life, we would need to give three pieces of information: which way it was turned, how far it turned, and what it was turned around.
In maths terms, these would be called:
1) Distance: How many degrees the object was turned. This is usually limited to 90°, 180° and 270°;
2) Direction: This is referred to as either clockwise (CW) or anti-clockwise (ACW);
3) Centre of rotation: In any rotation, there is a point that doesn't move, around which the turn is applied. We define this point as a coordinate.
How do we rotate an object or shape?
There are a couple of pieces of equipment you will need here: a pencil (sharpened), some squared paper and, ideally, some tracing paper.
If you don't have access to tracing paper, then regular white paper should work too.
Let's put these tools to work using an example now.
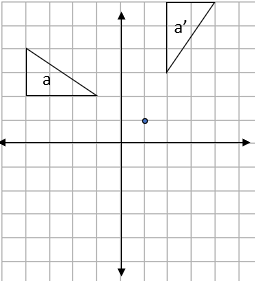
e.g. Rotate the triangle shown below 90° clockwise around the point (1,1):
Step 1: Draw out the information we have been given:
Sometimes, the shape will be drawn for you (as in this case), but if not, draw the shape and the centre of rotation first.
Step 2: Trace the shape and centre:
Put your tracing paper over your shape, making sure you also cover the centre of rotation:
We would recommend that when you trace the centre, draw a cross over it.
This makes it easy to see how far you have turned.
Step 3: Complete the rotation:
Place the point of your pencil on the centre of rotation (this makes sure it doesn't move while you turn the tracing paper) and turn the tracing paper 90° clockwise:
Step 4: Transfer the image and label:
The easiest way to transfer the shape back onto the paper is to lightly press on the corners of the shape with your pencil.
This will create indentations in the paper below that you can then join up to create the new shape.
Remember that if the image is labeled a, the rotation will be labeled a':
And it's as simple as that!
In this activity, we will rotate shapes around a given point using the method described above and solve problems involving rotations which have taken place.
You will find it helpful to have a sharp pencil, some squared paper and some tracing paper handy to support you in this activity. If you do not, you will need to be able to visualise these rotations in your mind's eye.


