“Kills 99.9% of germs” is a marketing claim of many household disinfectants and cleaning products, but how true is this statement? ‘Germs’ or microorganisms include bacteria, fungi, protozoa and viruses. They are microscopic, which means they are too small to be seen with the naked eye – you need a microscope to see them. Not all of these microorganisms are harmful however, for example there are millions of good bacteria in your digestive tract, but unfortunately some microorganisms can cause disease (we call these pathogens).
In this worksheet, you will learn about an experiment to test and compare the real efficacy (effectiveness) of common household antimicrobial agents (these are substances that kill ‘germs’). In other words, how good are these substances at actually killing microorganisms?
For this experiment, you are given at least three antimicrobial agents. You will also be provided with a Petri dish containing agar jelly. The Petri dish has already been inoculated with a bacterial culture (this acts as ‘the germ’). Make sure you keep the lid on the dish as much as possible during this experiment so that you do not risk contaminating the culture with other microorganisms from the air. If this happens, it will make it more difficult to interpret your results.
First lesson: Preparing the plate
1. Before you begin, make sure you clean your work surface thoroughly with disinfectant (you do not want to contaminate your experiment before you even start).
2. Using a waterproof marker pen, divide the Petri dish (sometimes called a plate) into four sections (do this on the underside without lifting the lid).
3. Label three of the sections with the names of the antimicrobial agents you are testing e.g. mouthwash, TCP, antiseptic cream etc. The fourth section is a control.
4. Now collect a pair of sterile forceps (these look a bit like tweezers). Sterile means ‘completely free of microorganisms’, so these forceps may be sealed in plastic packaging or they may have been passed through a blue flame of a Bunsen burner to kill any microorganisms present.
5. Using the forceps, pick up a small disc of filter paper and dip this into one of the antimicrobial agents e.g. mouthwash.
6. Place this paper disc at the centre of the section of your Petri dish that you have already labelled mouthwash.
7. Repeat steps 5 and 6 with the other two antimicrobial agents. Make sure you use a sterile pair of forceps each time.
8. Discard the forceps into a beaker of disinfectant when finished.
9. To set up the control, pick up a paper disc with a sterile pair of forceps and dip this into distilled (pure) water. Place this in the control section of your Petri dish. The purpose of the control is to check that only the antimicrobials are having an effect on the bacteria in the Petri dish. If the disc soaked in distilled water killed the bacteria, it would mean that some other part of the experiment and not the antimicrobials were affecting the bacteria.
10. Seal the lid on the Petri dish with clear sticky tape, using two small pieces. Do not seal the dish completely as this creates anaerobic conditions (lack of oxygen), which can encourage the growth of nasty bacteria.
11. The Petri dish now needs to be incubated for roughly 48 hours. The temperature should not be any higher than 25°C.
12. Make sure all surfaces are disinfected and wash your hands thoroughly with soap and warm water.
Second lesson: Observing the plate
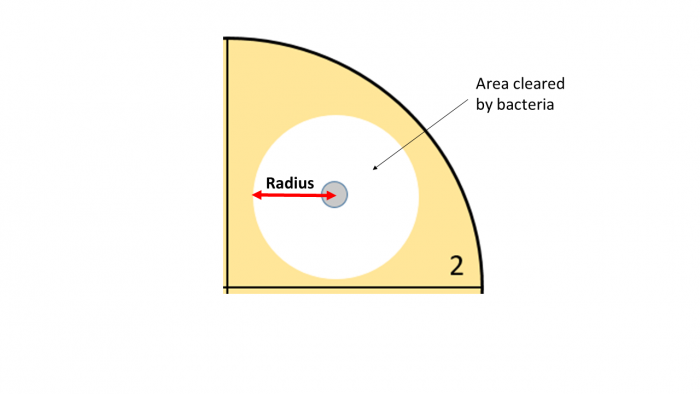
1. Use a ruler to measure the radius of bacteria cleared in each section of the plate in millimetres or centimetres (we call this cleared area the inhibition zone). The radius is half the diameter, so the easiest way to find the radius is to measure the diameter (this is the entire length of the cleared area) and then divide this value by two. Do not remove the lid.
2. Now use the equation  r2 to calculate the area of each cleared section and record your results. You should be able to find the Pi button (
 ) on your calculator. If not, just use the number 3.14.
Example: The radius of the cleared section of bacteria from the mouthwash disc is 3 mm.
3.14 x 3² = 28.7 mm² (to 1 decimal place)
The inhibition zone = 28.7 mm²
The larger the inhibition zone, the more effective the antimicrobial agent is. A large cleared area means a lot of bacteria have been killed.
3. Place all items in an autoclave bag for disposal and again, clean all surfaces with disinfectant. This is important not only because you should always leave your classroom as you would expect to find it of course, but also to make the area safe as you have been using bacteria. Lastly, wash your hands thoroughly with soap and warm water.
Are you ready to have a go at some questions now?


.PNG)


